Wednesday 25 July 2012

I do believe in fairies

Milly is now at an age where the nightmares she has stay with her and she has started to develop a bit of a fear of the dark and of being left alone at night.  It breaks my heart to think of her scared of anything at this age so we've invented a story to help things along a bit.  For all of her love of cars and lego and traditional boy toys she is a real girly girl and loves fairies, so we've told her the fairies will come and take away all the horrible things she dreams of and keep her safe.  Of course they need a way of getting in to her room so I took something else I've seen on the internet and used it to our advantage.

Knock Knock...


I have no idea what these things are actually for or what they are supposed to look like, so apologies to anyone who comes across this blog knowing their purpose.

You will need:

Air drying clay
Paint
Varnish
Rolling pin
Sharp knife
Paper and pens

Draw out your design on paper.  You don't need to be an artist for this - you are simply drawing a door.  Think about the size of your wall or skirting board when you do this because it needs to fit in place.  Any type of door will do.

Roll out the clay to about 1/2 cm thick, put your drawing on top and, using a ball point pen or sharp pencil, draw around the outline.  Cut around the indentation.

Now add your extras.  We had a rather famous teacher in college and I only found out about that fact on the internet a few years ago, which shows just how little attention I paid to pottery.  As a result, I am rubbish!  So, I went for some easy bits and bobs and added a "stone" arch and base, a tiny window, letterbox, hinges and door knob, a small plant, a few roses, a couple of butterflies and a ladybird.  If I was doing it again, I think I'd leave out the plant.

Leave to dry.  The packet I used said allow 3 to 4 days but mine was dry within 24 hours.


Once dry paint however you want.  Since I am a typical toddler parent I have absolutely loads of ready mixed poster paint in, so I used that.  It needed a few coats but its cheap and easy stuff to use.

Once again, leave to dry before gluing all the pieces together and varnishing.  If you want to add any glitter do so when the varnish is wet.  Wait for it to be completely dry before adding embellishments.


If I was going to do this again I would probably use normal modelling clay rather than air drying simply because it does dry out exceptionally quickly, which makes any smaller pieces difficult to create as it crumbles in your fingers.  I also wouldn't use my beloved global knife which has the end broken off it due to the fact that my husband thought it was the best tool to break a block of ice.  I'd probably get something a lot sharper for cleaner lines.

Saturday 21 July 2012

Our Feathered Visitor

Looks like the home made bird seed feeders have been a real hit.  In our garden the robins like peanut butter, magpies (ack) like suet and the blue tits love the ones made with gelatine. 


Wednesday 18 July 2012

L-O-V-E Love

6 years ago I made the invitations to our wedding celebration.  Hoarder that I am, I still have most of the things I bought for them including a small heart paper punch and they're all kept together in one of our kitchen larder units which has been taken over by craft items.  Milly spotted it for the first time and, silly woman that I am, I showed her how it worked.  Of course these objects are not made for the finger strength of a 3 year old so I punched a few hearts for her.

DO IT AGAIN!!!!!

I decided that if I was going to punch holes in to ever item of paper in our home we may as well do something with it.

All you need is love


...and a heart shaped paper punch
and coloured paper
and something to mount them on
and glue
and a pencil 

Punch so many hearts out the coloured paper that you lose the feeling in your thumb


Draw a heart shape on to your mounting material.  We used black foam because its what I had to hand.

Fill the heart shape with glue and stick your little hearts in place.  Smaller children might need some help with the heart outline.  Continue until you have filled all spaces with mini hearts.

We decided to frame our picture, but it would work really well on a card.  If you have more time then a series of hearts on a large card would make a lovely picture.


Here Comes the Sun

do do do doooo


You know how you go to the loo and the phone rings, or you buy the dress you've been looking at for ages only for it to go in to the sale the next week?  We're talking about the sort of thing Alanis Morissette would turn in to a mislabelled song.  Well, today I am daring Mr Sod to do his best with that law. 

Its been months since I was able to hang out a full load of washing without sky watching and keeping my fingers crossed the rain would stay off long enough for it to dry, so I am certainly not in need of enough pegs to fill my line.  If we suddenly find that summer hits next week you know who to thank.


When is a peg not a peg?

You will need:
Assorted wooden pegs
Paint and brushes
A black marker pen
Assorted glitter, glue, sequins, gems (optional)
A plastic plant pot, empty tin or cardboard frame shape (optional)

Take whichever item you are going to peg (the pot, tin or frame) and work out how many pegs you will need to cover the area completely.

Set out all of your pegs and paint assorted designs on them.  If you have time then paint them on both sides and on the inside.  Ours is a bit limited today but the beauty of this is that you can always unpeg them and do more another day.

Once they are dry, outline any painted shapes with the marker and add the embellishments as required.


Clip in place on your chosen item.  Alternatively use on a ribbon / string notice board, attach a magnet to the back and use as a picture / note holder or glue on to a baton to hang small items from (ideal for childrens necklaces and bracelets).

We turned ours in to a paint brush pot


At some point we will take them all off and paint the inside, but thats a craft for another day.

Monday 16 July 2012

Feed the birds

Unfortunately for slightly more than tuppence a bag.

The holidays are little more than a distant memory, the tan has faded and I'm thinking about turning ark building in to a Wednesday craft.  So, its back to crafting and blogging to fill our rainy days.

Since we've been away the weather has turned my postage sized garden in to something of a jungle and we have rather a lot of visitors of the feathered variety.  Now I'm not the biggest fan of birds - they fall in to the general category of things that are nice to look at but may fly in to my face - but the small one likes them and our first floor living room means we get a good view without fearing some sort of Hitchcock style open air attack.  Besides, I like to live life on the edge from time to time so lets encourage them.

Who needs Mary Poppins anyway.

You will need:
Pine cones
Bird seed
Twine
Peanut butter, suet, honey or d) all of the above.
Gelatine (I read on the internet that this is fine for birds so I hope this is true!)
Assorted cookie cutters
Greaseproof paper
Trays
Straws chopped in to 4
Food colouring (optional)
A tall person

Basically this little lot

Easy one first.  

Tie some twine around a pine cone and leave enough length to be able to tie easily around a something. 

Base your decision on which sticky stuff to use on the likelihood of finger licking and mix together some of the seed.  

Shove in to the pine cone and squish together with your hands to form a ball and ask someone tall to hang in a tree.  

Milly is all about instant gratification so she liked that she was able to put these out straight away.


Bit more fancy pants one.  

Mix a packet of gelatine as per the instructions on the packet and allow to cool slightly. 

Add enough of the seed so it is coated but not wet (for us, that was about 700ml in a jug).  If you want to colour the seed do so at this stage by adding a couple of drops of food colouring.  We went for pink of course.

Line a baking tray with greaseproof paper and set out your cutters. Smaller cutters tend to make more mess so if that's what you have you might want protect any fabric surfaces first because this stuff is about to go everywhere.

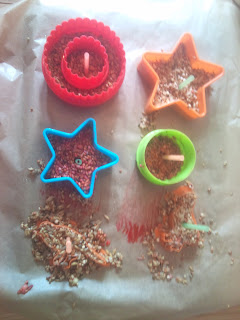
Fill each cutter with the sticky seed and press down firmly with the back of a spoon.  Push a straw in to each shape and allow to dry (for us this took a couple of hours). 

Home made bird seed feeders


Gently push each seed shape out of the cutter and remove the straw.  If they're still a bit soft, stick them in the fridge to harden up completely.  Tie the twine through the resulting hole. 


Home made bird seed feeders
They stay inside until that rain stops


This would make a nice gift if you replace the basic twine with something like ribbon or brightly coloured string.  You could even do a rainbow of colours or wire up shapes inside of shapes with a bit of patience (so that would be us out).

If anyone who looks like Tippi Hedren turns up, leg it.