Friday, 14 December 2012

I'll Be Home for Christmas

Hopefully, assuming we don't have a problem with our flight.  We are now all ready for Christmas - presents are wrapped, food for the hamper is made, Milly's rag doll is almost finished and the spare room has become cardboard box city from all the deliveries.  Must do something with those in the new year.  I'm thinking play shop.

This week we made biscotti (or sausage biscuits as miss likes to call them) and its a recipe from good food, so I'll just give you a link to that below.  We stuck almost to the recipe but I substituted cherry for cranberries, just because I like them.  We did, however, do a very very quick gift craft which makes a relatively low cost gift a little more personal.  Its another of those where you do most of the work, but such is life with kids and crafting.

Here Comes Santa Claus


You will need:

A vase big enough to put your entire hand inside
A sharpie (remember those from the labels?)
Paper and pens
Sticky tape of whichever brand you prefer

Cut your paper so its no larger than the height of your vase

Ask your child to draw whatever pictures you (or rather they) want.  Milly decided on Father Christmas, a snowman, a helicopter cat and a round Christmas tree. 


Cut out the pictures you want to put on to the vase (I decided on Father Christmas and the snowman, plus her name) and tape them on the inside.

Trace around with the sharpie.  You might need to do this a couple of times because the pen doesn't always draw that well.  I should imagine it would be better on a ceramic but then you have the faff of getting the picture on there in the first place.  Its one for us to do in future when Mill can be trusted to not draw a helicopter cat on something.

Remove the paper and allow to dry.  Jobs a good un.


I haven't tried to wash these so I have no idea if the picture is going to wash off the minute it touches water, but I don't think it really matters since they still have a vase at the end of it.

We've also been tagging and wrapping.  The bird seed feeders now look like this

Home made bird seed feeders
Bird Seed Feeders with a touch of Christmas Sparkle


and our Christmas hampers look like this (minus the bag of biscotti)
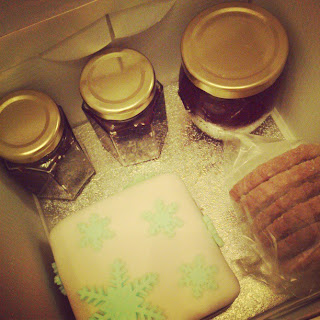
Small Christmas Hamper
Christmas Food Goodies


if you want a list of the recipes I've used here you go:
Spiced beetroot and orange chutney   This is lovely and can be done at last minute
Spiced plum chutney  I make this every year.  Its a bit late for it to be ready for Christmas but its still suitable for a gift with strict instructions to leave it for a few weeks.
Christmas Cake I make mine in October but there is no reason why you cant do a last minute version.

Champagne and Strawberry Jam  


This is my recipe and it makes an 8oz jar of jam .

You will need :

200g strawberries
180g jam sugar
1 large bottle of champagne (or cava)
1 lemon.
A saucer in the fridge

Chop the strawberries in to 4 and add to a pan with the sugar.  Leave for about an hour for the juices to start flowing (or don't if you're in a rush).  If you want big chunky strawberries at the end, leave overnight.

Add a squeeze of the lemon and about half a glass of champagne.  Get your saucer ready.

Heat gently to dissolve the sugar, stirring as you go, and then bring to the boil.for about 5 minutes (double check after four).  Remove from the heat and spread a little on the saucer, give it a minute and then push it about a bit.  It should be all jammy and thick and wrinkly when you push and not sloppy.  If you have slop, give it another minute or two and retest.

Allow to cool and then pour in to sterilised jam jars.

Drink the rest of the champagne to celebrate.

Christmas Biscotti / Sausage Biscuits

The biscuits are simply shortbread with 1/2 tsp of cinnamon and topped with cane sugar.

So, its been a busy old week.  There are other things I will show you in the new year but since they're gifts for people who read this blog they're staying under wraps for now.


So that just leaves me to say have a very merry Christmas and a wonderful New Year xxx


Monday, 10 December 2012

Rudolf the Red Nosed Reindeer

once gave Santa's sleigh a lift.  And when mixed in with maltesers, makes a really simple gift.

Move over Bernie Taupin, there's a new kid in town.

Reindeer Noses


You will need:

1 bag of maltesers
1 bag of either red foiled chocolate balls or a bag of mixed m&m's and a willingness to eat everything that isnt red.  yum.  If youre in the UK a rather large supermarket chain beginning with T and ending in esco sells the ones I've used.
1 cellophane bag per person


Lob 8 maltesers and 1 red chocolate of choice in to the bag.  Tie with your pre-prepared rudolf labels.  Go.  


Requires absolutely no adult help once a child is
a) able to count to 8; and
b) able to resist eating the majority of the maltesers.

So, should be fine once they hit retirement.  Maybe.

Merry Christmas, Love Milly


Frosty the Snowman

Was a jolly happy soul.  I find that hard to believe given how moody all snowmen look, especially that one on the advert that you know wanted diamonds but ends up with gloves.  The power of love aint that strong.

So, crafting.  A while back I saw the cutest little snowmen on pinterest and decided to make them as part of our craft.  Unfortunately the geek in me refuses to read anything which may appear to be an instruction and I went on the wing in theory.  It was about 30 seconds in to said winging that I realised this is not a craft to do with a 4 year old or a 30 something year old with limited patience for things that ping out of your fingers.  Here are the instructions if you really want them.  They do look cute after all.

Pin it


You will need
(per snowman)

2 small white buttons, each with two holes
4 black seed beads (plus another 10 that will end up on the floor / down your top / in your eye)
1 medium brooch fastening
Strong Glue
Two pieces of felt (colour is your choice, but I had green and red in with it being Christmas so went with the pinterest picture)
Assorted small sequins
A cocktail stick
A large stiff drink.


Down the drink.  You're going to need it.

Cut a hat and bow tie shape out of the coloured felt and place on one side.  Tell yourself that this is going to be great.

Glue the two buttons in place on top of the brooch, so one appears to be the head and one the body.  Still tell yourself this is going to be great.

Hand the brooch to your child along with some pva glue, the cocktail stick and the beads.  They have small hands so it should be good for them, right.  Wrong.  Quickly realise that there is pva glue everywhere, apart from in the place you want it to be and the snowman appears to be melting since his eye is now somewhere near his navel.  Stop lying to yourself about the great thing, throw that one away and start again.  Allocate your child the job of passing things to you.  With the cocktail stick, blob in some strong glue just inside the button holes and drop the beads somewhere near to them.  Push in place and leave to the side to dry.  Repeat for all your buttons whilst slowing losing the will to live.

Meanwhile, get your small person to stick a sequin on to the bow tie.  Put a blob of glue on to the back and stick in to place on the snowman.  Do the same with the hat.

Be thankful that the buttons only came in small packets, put something Disney on the TV and relax.

Homemade snowman button brooch
Malevolent Snowman Army


Wednesday, 28 November 2012

I'll have a blue christmas without you

I have a craft related injury thanks to a bit of a slip when machine quilting at the weekend (yes, that does hurt as much as you imagine) so one trip to a&e later and my finger is in a ridiculously over sized bandage which hinders my ability to do anything let alone craft.   So this week I am without hand meaing we went for a tried and tested craft that I know the small one can do almost entirely alone.  She just needs me to boil the kettle and the rest is down to her.

Rockin' robin


to save you searching back through the blog you will need
bag of bird seed
cookie cutters
one sachet of gelatine
straws
greaseproof paper

plus, to Christmas it up a bit

glitter
Christmas ribbon


This amount has made 6 large bird seed feeders and 4 small ones (so would probably make 7 large ones if you want them for gifts).   I wouldn't recommend making more than one sachet at a time because you want to make sure all of the seed is covered in gelatine.


Lay out a sheet of greaseproof paper on a flat surface.

Make up the gelatine according to the instructions on the packet and add the seed in.  Throw in a bit of glitter.

Chop up your straws to make holes for the ribbon.

Place your cookie cutter on the paper and sprinkle a little glitter inside.  The right way to do this is to put silver all over, pink at the top and blue at the bottom.  Anything else is wrong. FACT.  

You may need to wear a woolly hat at this stage to prevent glitter getting in your hair.


Fill your cutter with the sticky seed and press down with the back of a spoon.  Sprinkle some more glitter on top.  

Shove the straw in place and leave to dry overnight.  


We're at that stage now, so I'll do an update when they're dry.  We've also tried a little mini seed chain so if they work, I'll put a picture up.


Friday, 23 November 2012

Santa Baby

I have been an awful good girl Santa baby so if you could see your way to that light blue convertible that I ask for in song every year it would be great.  You can still keep the sable though.  I'd rather than wasn't slipped anywhere, let alone under my tree.

Thanks

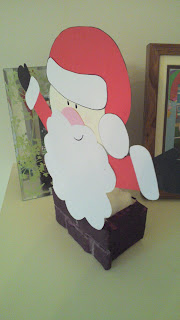
This craft was inspired by something I saw on pinterest last year which we had great fun reproducing it on the back of a cornflake box covered in wrapping paper.  This year we've taken it a bit further and added a few bits meaning we got to sing the same song over and over and over and over...

When Santa got stuck up the chimney


*sing it again*

You will need:
A teabag box 
4 or 5 pieces of kitchen roll
PVA glue
Paint
Assorted card (or white card that you are happy to paint)
Cotton wool
Sticky tape
A glue stick


First, prepare your chimney.

Open up your teabag box .  The lid is where we are going to stick our father Christmas later on so don't do anything to it.

Cut brick sized bits of card from whatever scraps you have.  We decided to just do the front of the box.  I know Milly has limited patience for repetition so making 5 bricks is fine.  Making 20 bricks would result in me doing all the work.  Once cut make sure that they can be positioned as you want on the box.

Next cut strips the width of your brick from one of the pieces of kitchen roll, roll and stick on top of each card brick using the tape.  Once completed tape the lot in to place.


Rip up the rest of the kitchen roll.  Mix together equal parts of pva glue and water and use this to stick the kitchen roll all over the box and bricks.  We're going for texture here so don't worry if they make a mess of it - glue is fun!  Leave to dry.

Now we're going to make Santa

Spend 5 minutes explaining how Santa is the same person as Father Christmas and not his brother.

Draw yourself a FATHER CHRISTMAS on paper to get an idea of the proportions if you want.  Go for simple shapes which will be easy to cut out from card and stick together rather than complex arty stuff.  You can make any sort of face, body, position etc that you want to but make sure he has a great bushy beard.  Transfer your drawing to card, cut out and hand over to the small person to stick together.  Leave to one side.

Now paint your chimney any colour you want.  We went for real feel red brown with grey cement because Milly is a fan of things looking correct, even if they are made of bits of ripped up kitchen roll.   Leave to dry.  Ours dried a lot darker than expected so if this causes a problem, tell them the big man comes at night.


To assemble, simply stick father Christmas to the chimney and fill the back with 24 balls of cotton wool.

Santa wishes he was holding hands with peppa pig.

Father Christmas Advent Calendar


Each morning during December until Christmas Eve your small person can take a ball of cotton wool and stick it on his beard using  glue stick.  When the beard is complete that means ITS CHRISTMAS!!!!


We've also been making Christmas cake and chutney ready for Christmas hampers.  Mill was less than impressed with the colour and texture of fruit cake.


Saturday, 10 November 2012

Oh Christmas Tree

Remember the salt dough decorations from a couple of weeks ago?  Well we've now threaded them and beaded them.  Instead of lots of knots, I helped out with crimping beads and a pair of pliers and this is what we have

Salt dough Christmas decorations


Not bad for a bit of flour, salt and water.

Its beginning to look a lot like Christmas

Fortunately there are approximately 48 million Christmas related phrases out there, so I have lots of potential post titles.

About a month ago we started on our Christmas craft journey of spending far more making home made versions of things you can buy for 50p in the shops.  Still, it makes the small one happy and she gets to explore a bit of magic along the way.  In this case, embossing and the watch what happens when we apply heat factor.  Sometimes you forget to be impressed by the simple things so having a 4 year old makes you stop and wow right along with them.

Tagging, Xmas Stylee


(I'm hip with the kids)

You will need :
Assorted luggage labels 
Hole / ring reinforcers
Ribbon
A stamp 
An ink or embossing pad with powder
A heat gun if you are going to use powder
Stick on gems
A coloured sharpie


If you going for an ink pad and stamp, this is one you can leave entirely to the kids.  If you're using a heat gun its absolutely not suitable for them to do solo.  If you haven't used one before these things get extremely hot extremely quickly so keep the kids away.  And no, it doesnt work with a hairdryer.  Yes, I've tried.

This is a really simple one.  Take a label and stamp away.  If you're using embossing powder then its great fun watching your child applying invisible ink and then pouring magic glitter over the top of it.  Do not expect perfection, straight lines or even a neat label.  Do expect them to have great fun and want to stamp everything in sight.

When each one is finished, use the heat gun to activate the embossing powder if they're using that whilst they get on with the next label.

Next take two of your hole reinforcers for each label and, whilst still on the backing sheet, colour them in with the sharpie.  These things are great (and we'll be using them shortly on the next Christmas craft) because they don't run or bleed or make a mess when you accidentally rub your arm on them.  However, they are also very very permanent so watch your surfaces.  Leave these to one side to dry completely.

By now your ink should be dry or the powder should be cool, so take your gems and decorate the label.  We went for a very simple Rudolf theme so we stuck on a single red nose gem.

Home made christmas labels
Rudolf denied accusations of nepotism in the sleigh pulling interviews

Remove the strings and place a coloured hole reinforcer on each side of the label.  If you're lucky the ones that are stuck on already can be removed.  Ours couldn't, so we just stuck them on top.  Simple.


These are large labels because they will have information on the back.  More of that to come in the next few weeks...

Wednesday, 31 October 2012

Making Christmas, making Christmas

lalala

Yes, its still October and yes, I've said the C word.  I admit that I'm a bit of a Christmas maniac - I'm the type of person to put a tree in every space of our house and I fully intend to infect the small one with this fever so by the time she is a women in her 30s she will still get excited at the first holidays are coming advert on the tv.

We've actually been quite busy crafting over the last few weeks on Christmas gifts from Milly, but nothing is finished.  This is one of those spanning lots of weeks project so you will have to come back if you want to see the final product.  Its the lord of the rings of craft projects, if you will, only with fewer potential endings and no elves.  Ok, maybe elves.

Not bread again


...said Milly when I announced we were making salt dough

1 cup flour plus some for rolling
1/2 cup warm water
1/2 cup salt
1 tbsp oil (optional - I find it makes the dough easier to work with)

to make that in to a Christmas decoration

absolutely anything to cut out a shape
absolutely anything to make impressions in the dough (optional)
a rolling pin
assorted paint (we used a metallic paint from tesco, a gold glitter paint from ELC and some white paint from asda)
a decision on how to hang it and either rings or string depending on what you choose


Mix everything together and that's it really!  If its too dry shove in some more water, too wet add flour.  

We decided to make some impressions in the dough using some snowflake cutters I had for last years Christmas cakes and then cut out shapes with cookie cutters, but you could use just about anything really - finger print impressions and a circle cut using an egg cup would be great.


Once cut decide how you're going to hang them.  We're trying a combination of ribbons which require cuts in the shape, string requiring a hole (I used a cocktail stick to form this), and rings which I will buy at some point in the next couple of days and glue in place.  We had rather a lot of dough left at the end of our cutting so we made little beads too so miss can have a princess necklace.  Not sure Kate would wear a salt dough necklace but you never know.

Salt dough Christmas decorations


There are lots of cooking instructions on the web for salt dough.  I normally bake mine at 100 degrees for 3 hours (or until they are firm but not coloured in any way) but I wanted to try the microwave method.  For this you apparently simply place in the microwave for 1 - 2 minutes and bing they're done. Unfortunately I bing almost set my microwave on fire and bing made my kitchen smell of bonfires.   If you know how to do this without causing a major crisis then go for it.

Once cooked and cooled, its time to paint, and that's what today's activity was for us

Witch costume also optional


Next I will varnish them and then we will put them all together and attach them to the labels we've made (instructions coming soon).  But that's an activity for another day!  One without witches I imagine.


Tuesday, 16 October 2012

Happy Anniversary

6 years ago this happened


We had the perfect wedding and I married the perfect man.  Its all rather soppy really.  A couple of years before this happened mr invited me over to his place for an evening of fine foods, intellectual conversation and a drop of port towards the end of the evening (or maybe it was a bunch of mates getting drunk and playing twister).  At some point in the night he decided that dressing up in a tux, playing the ferrero rocher music and bringing in a tray of said choccies was a brilliant idea.

Regardless of the cheese, he won my heart and the rest is wonderful history.  Its a memory that needs to be celebrated so when I found out that six years together means a gift of sugar or iron I knew which one I was buying, and it wasnt made by tefal.

Why monsieur, you are really spoiling us


You will need : 

One polystyrene ball
One length of dowel
Plaster of paris
A pot
Tin foil
Clear glue
Assorted ribbons
Organza or tissue paper
64 ferrero rocher (which is a heck of a lot more than I expected).
The will power of an elephant

To start, I will say I bought a kit containing the ball, dowel, pot, plaster and ribbons.  I priced up getting everything individually and by the time I'd paid for p&p for each one it worked out considerably cheaper to get it in kit form from one place.  If youre making multiples for table decorations then it might be worth getting them seperately.  If that is the case, I used a 30cm length of dowel and a 120mm polystrene ball so adjust the number of chocolates if you buy smaller or larger.


Ok, this bit is pretty obvious but I'll go through it anyway.  Wrap and glue the ribbon around the dowel.  Prepare the plaster of paris as per the instructions on the packet and pour in to your pot.  Shove one end of the dowel in to the ball and sit the other in the plaster of paris and leave to set.

Now for the *ahem* fun bit.  Cover the ball in foil.  This will allow you to re-use (or sell on!) your sweet tree after you've finished with it.  Starting at the top add some glue to the back of the ferrero rocher and to the foil.  Hold in place until set.  Gravity will play its part in making this a tedious process unless you go foil-less, but you should be able to do 4 or so chocolates at a time and hold them all.  DO NOT EAT THE CHOCOLATE.  Continue until you've covered the entire ball and leave to set.  You will need to do this either the moment before you intend to give it as a gift or at least a day before because gravity will start to bug you once again by dropping the chocolates out of their wrappers, so DO NOT EAT THE CHOCOLATE - just glue them back in to place and feel better knowing that you will be sharing it eventually anyway.

Finish by decorating in any way you want.

Ferrero Rocher Sweet Tree


If you want a more budget option then melt a little milk chocolate and use that to stick maltesers on to the foiled ball, use cocktail sticks on marshmallows or licorice alsorts "kebabs", or just hoof lollipops in to the polystrene.  Its all sweets, so its all good.


When rhyming goes wrong

Milly loves rhyming and will happily sing song her way through bizarre combinations of words, birds, sirds, flubberlerds.  Many make absolutely no sense but its cute to listen to, until it goes very wrong and then you have to not react to luck, suck, duck f... you see where I'm going with this.

So today we're making food that has no rhyming risk factor.  I have a feeling this may become a theme over the next few weeks, or until the next phase hits.  Please dont let it be a reoccurance of "where do babies come from?".

Nice Ice Rice Flice Buns Huns Suns Guluns


1 batch of basic bread mixture recipe here 
75g sugar
1 egg

Icing sugar
Food colouring
Assorted sprinkly goodies.

Extra flour for rolling.
Vegetable oil to prevent the bread sticking


Make up the basic bread mix with the sugar and egg added.  Alternatively take any white bread mix / recipe and add the sugar and egg, leave to prove in an oiled bowl for 30 minutes.

Remove the dough and smack around a bit.  Make tthhhhhssssss noises at the same time.

Divide in half, and then divide each half in to 5.  Hand over to your miniture person and have them split each portion in half and form a ball shape.  Dont expect equal quantities but its nice for them to learn the concept of half and double.  Roll each ball in to a sort-of-sausage.  Its much easier for them to roll the dough (which is rather sticky) if you get them to flour their hands slightly before you start.

Milly demonstrates a dough sausage

Add each sausage to an oiled tray, cover with oiled clingfilm and leave in a warm place to double in size before baking in my oven at 170 degrees for 10 minutes.  Keep an eye on them - they do cook quickly so can turn just as fast.

Remove and allow to cool completely.  Open every door and window in your house so everyone gets a chance to smell freshly baked bread.  Pat yourself on the back for making the neighbourhood jealous.

Make some thick icing for the top - we went for tiffany blue and bubblegum pink (see, I can be foody when I want to be).  Pour on to a side plate and press each bun in to the icing.  Top with funky sprinkles and shove in the fridge to allow the icing to set.  Eat the left overs.


Scoff, cough, loff, bo....maybe not.

Toddler made ice buns


Isn't technology great?

It is, isn't it.  It wasn't that long ago that we all had to make the journey to our local snappy snaps to pay a silly amount of money for photographs that could be 24 shots of your knee.  Now we point, click and delete to our little hearts content, safe in the knowledge that we can delete that picture of us that displays several chins.  So big yay for technology \0/ except when something goes missing, which is exactly what happened to me after we returned from holiday.  I lost the camera cable.  Suddenly I had a camera of pictures and no amount of waving it in front of my laptop was going to make those pictures jump on to my screen.  I tried begging, shouting, promising to take it out to dinner and treating it like the wonderful bit of technology it is but nothing. 

Until this evening when a search for nail varnish remover turned up my precious baby.  So, on with the blog.


(and just because I can, here is a picture from our holiday)

Enjoying the slinky dog ride at Disneyland Paris


Tuesday, 18 September 2012

Such a perfect day

Happy birthday to our perfect little girl


I love you more than life.

Wednesday, 12 September 2012

You have to ask the right questions.

Question : Would you like to make pastry Milly? 
Answer : In a minute.

This is basically how the first hour of our morning went.  Honestly it was my fault because at some point in time I asked if she wanted the Disney channel on and Jake and the Neverland Pirates is always going to superior to anything I say. I turn in to an adult from those Charlie Brown and Snoopy cartoons as far as the small one is concerned.   I thought I made perfect sense but her toddler ears were hearing whaaaa whaaa whaaa.  So a change of tact was required and instead it became:

Question :  Would you like to make pastry, then we can put it in the fridge to go cold enough for you to roll out and cut in to shapes?
Milly translation : whaaaawhaaaa whaaaa roll whhaaaawahhhaaaaa cut out  whaa

but I used enough child friendly words in my overly long question to break through the power of the cartoon and away we went.


Whhaaaa whaaaa apple pie


 For the shortcrust pastry

100g plain flour
50g softened butter (it really does need to be butter, so set a reminder to leave it out)
20g icing sugar
1 egg

For the filling

2 - 3 medium eating apples
2 tbsp sugar plus extra for sprinkling over the top
1 tsp vanilla extract
Rind and juice of 1/2 orange


To make the pastry sift the flour and sugar together, add in the butter and get your hands in there!  Rub the butter and flour between your fingers until it looks like squashy sand which smells nice.


Add roughly half the egg and bring the pastry together with your hands.  Wrap in clingfilm and bung in the fridge for half an hour.

Watch an episode of Jake and the Neverland Pirates.  By the end of that it should be time to...

...finely chop the apples and place in a bowl.  We didn't cook these, mainly because I prefer the texture of whole chunks of apple rather than apple puree, so they need to be pretty small.  If you want to cook the apples, then chop whatever size you want and cook with the orange juice and vanilla.

Add the rest of the ingredients, stir well and put to one side.

By this time your pastry should be nicely chilled so remove from the fridge, flour your surface and hand over to your small person to have fun with a rolling pin and assorted cutters.  

Once you've finished the rolling stage give the apples another stir.  There is going to be a lot of liquid at the bottom of the bowl so drain some off if you have a dive in there toddler who doesn't care about soggy bottoms.

We decided we were going to make decorated free form pies simply because they're easy to do.  Whatever you choose, cut your pastry to suit the case and fill with the apple mix.  Top and brush with the remaining egg.  Sprinkle on the sugar (or sugar and a touch of cinnamon) and bake for 20 - 25 minutes at 160 degrees in my oven, or until golden brown.

To make free form pies just cut the pastry to size for your toddler once they've finished rolling and they can do the rest.   Under 2's will need a little more guidance but its still a great one for them to assert a little independence in the kitchen.  Push the pastry in to the case, slightly over fill and then push the pastry back over the filling.  Decorate with pastry shapes.


Free form apple pie


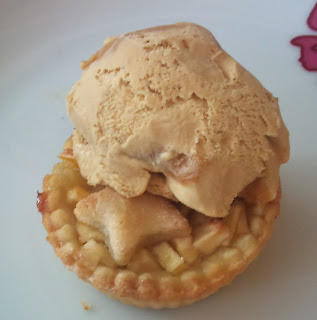
With the remaining pastry Milly made an apple tart for Areal who, being a mermaid princess, prefers them to pies.  She also has a fondness for toffee ice cream.

Apple tarts


I could cook apple pies all day every day.  Its one of the first things that I was taught to cook as a child by my grandmother.  One day I might make a pie that tastes as good as hers.

Wednesday, 5 September 2012

Party planning

The small ones birthday is rapidly approaching and so its time to try out some new ideas and recipes.  I asked some friends for their tried and tested cream free cakes and got this recipe : Easy chocolate cake from the bbc (thanks Mel).  They're right, its easy.  I halved all of the quantities and used less water, but this is simple enough that a child can run solo until the boiling water point.  Once cooked and cooled slightly, I filled them with peanut butter. 

So that's the birthday cake sorted but I also wanted to add in a savoury recipe.  I'm on a bread free diet at the moment so I thought I'd torture myself a little.

When is a pizza not a pizza?


I googled that question and there appear to be lots of answers involving Nepal and a handful of restaurants.  That is not where we're going with this recipe.

1 batch of basic bread maker dough (or bread dough of your choice) * see below
1/4 jar pesto
1/2 ball mozzarella
1 cooked chicken breast
2 tbsp chopped green olives
Black pepper

Prepare your dough.  Once risen turn out and roll in to a rough rectangle, about the size of a standard oven tray.

Spread the pesto over the dough and dot the other toppings over.   Try to keep any thicker toppings in line with the longest edge.


Roll from the longest edge, flour your knife and cut in to one inch thick rounds.  These aren't going to be perfect because of the size of the toppings so squish them about a bit.  Add to an oiled tray, pushing each slice against the last, and leave somewhere warm to rise for 30 - 45 minutes.  They should be the size of the tray 


Bake for 20 minutes or until golden brown.

Tear and share, as the law of these thing go

Tear and Share Pizza Bread


I think we're going to try the next ones with a rosemary and tomato sauce, goats cheese and black olive and a pepperoni and mozzarella.  Basically if you can imagine it on a pizza, you can shove it in this bread.


Daddy Dough


Mr Geek has been baking bread for close to 2 years now and is a bit of an expert in my opinion.  This is his basic machine dough that will make a medium / large loaf, 8 - 10 rolls or a tear and share pizza bread.

1 1/8 cup tepid water
3 cups strong white flour
1 tbsp oil (he uses vegetable)
3/4 tsp salt
1/2 tbsp caster sugar
2 tsp dried active yeast

Bung the lot in the machine, select the dough option and away you go.  If you're putting it on the timer, add the wet ingredients in first, followed by the flour, salt and sugar and finally add the yeast.


Wednesday, 22 August 2012

Holla!!!

Our voyage on the savoury sea hit a Disney princess shaped iceberg this week.  Tangled ever after was on tv and this will always be better than baking as far as Milly is concerned, so we waited for that to be over.  Then there was some sort of Disney princess special on with women in very large dresses and wigs and even the promise of plaiting bread couldn't tempt her in to the kitchen, so today I ran solo.  I'm adding the recipe anyway because it is something a toddler can do, just not one with a princess obsession.

I decided to make challah bread as a nod to my years being educated in a Jewish school.  It was always one of my favourites and something I used to make rather a lot.   There are lots of variations out there that use different quantities of sugar or honey but this is one I like.  Feel free to remove the fruit if you're not a fan.

Time to get plaiting

You will need:

750g strong white flour
4 tbsp vegetable oil
1 tbsp dry yeast
200ml boiling water
100ml cold water
4 tbsp sugar
1/2 tbsp salt
75g mixed dried fruit (I used raisins, currents and cranberries)
3 eggs

for the topping
1 egg
sesame or poppy seeds


Dissolve the yeast, sugar and salt in the water and add the oil.  Leave for 5 - 10 minutes until the yeast starts to foam slightly.

Add in the eggs one at a time and mix well.  I use a hand mixer for this but you can do it by hand if you want.

Mix in around 3/4 of the flour and combine well.  It should be sticky and stringy at this point.  I gave up with the mixer around half way through the flour because it starts to travel up and makes a mess, so it was hands in at that point.

Turn out on to a floured surface.  Add in the rest of the flour and knead for a good 10 minutes.  Place in an oiled bowl, cover with cling film and leave in a warm place for an hour.  Since we own a new fangled eco style house which contains the worlds largest heat recovery system in the airing cupboard I stick my bread in to the top of our double oven with the bottom turned on to its lowest setting.

After an hour turn out again and punch it about a bit.  If you're doing this with your children then you can complete the next stage if you want but you will get a better bread if you leave it to prove for another 30 - 40 minutes or so if you can.

Turn the bread out again and flatten slightly.  Pour the fruit in to the middle and fold back on itself.   Do not over knead at this point.  If you want to do half without the fruit then split first and use less fruit.

Split the dough in two and plait in any way you wish.  I went for a simple three strand which is suitable for a toddler to do and slightly more complex 6 strand option which isn't unless they're in mensa.  There are lots of tutorials on the net for doing this if you have done it before.  Youtube is worth its weight in gold when it comes to bread plaiting.

Beat the remaining egg and brush over the top of the bread.  Top with sesame or poppy seeds as desired and cook for around 30 minutes at 160 degrees or until golden brown and hollow sounding if you tap the bottom.

3 and 6 strand plaited challah


Its rather nice served warm  - ideal for afternoon tea

Check out my irregular plaiting skills


One day I'll teach Milly to bake bread.  Maybe.

Wednesday, 15 August 2012

Slave to the Gogglebox

Last week I decided that we were going to do more savoury recipes in the coming weeks.   Hubby bakes bread and it always looks like such fun that I thought perhaps we could work up to that, starting out with a sweet bread and breaking in to savoury types later on.  So today should have been spent making cinnamon rolls, an item that not only have I never made but I've never actually tasted.  Unfortunately when I started looking around for recipes they all said things like mix together and leave for 2 years to rise.

Patience is only a virtue for those who don't work in the afternoons so I decided to use the bread maker, found a recipe to base our morning on, got the ingredients ready....and then watched the Great British Bake Off on tv and all plans went out of the window.  Savoury can wait - I wanted cake!

Actually its upside down


(said Milly to my mum)

This makes 6 small cakes.  If you want to make a large cake, double up on everything and add some extra fruit. We used a very shallow brownies tin which meant we didn't want lots of berries in there.

A good handful of berries of your choice (we used a mixture of strawberries and blueberries)
25g unsalted butter
25g light brown sugar

1 lemon
2 eggs
100g self raising flour
100g caster sugar
100g whatever fat floats your buttery boat

Chop the strawberries to blueberry sizes bits.  Milly is old enough to do this herself, which was shouted at me when I offered to help out.

Whilst your toddler is asserting their authority, melt the butter and sugar in a pan.  Remove from the heat and toss in the berries.  Shove on the side.

(Basic viccy sponge coming up).  Cream together the butter and sugar.  Add in the eggs one at a time.  Add the zest of about half of the lemon (and juice if you want - I didn't).  Add in the sifted flour.  Its an often repeated recipe on here.   Apparently it also makes the best mix to lick at the end.

Add a spoon of the berry mix to the base of each of your cases or tins.  Top with the cake mix and bake for about 20 minutes at 160 degrees.  Do remember to put a tray underneath because the fruit juices and caramel mix will probably go everywhere.  Of course I did this and wont be spending my evening cleaning the oven.  

Turn out on to a tray or plate and shove the tin in to water before everything gets sticky.   Ice the top if you want to but, in all honesty, this is a pretty ugly cake.  Tastes good though so I forgive it.  It would be gorgeous served warm with a good blob of clotted cream.

Beauty is only cake deep


and since I'd found that recipe anyway, I made the rolls

Recipe here


but I halved everything, ignored the nuts and sultanas and made a topping of icing sugar, vanilla and milk.  I also rolled from the short edge, chopped in to 8 exactly equal sections (honestly) and cooked them in a muffin tin.   If you have an under 2  give them the cinnamon sugar to sprinkle and the finished rolls to ice.

Mill ices cakes and gets the tea ready

I think that's Christmas morning breakfast sorted for this year.  They are very very yummy.

Wednesday, 8 August 2012

I Dont Like Cream

I sometimes wonder if Milly was switched at birth.  I can cover just about anything in cream and be a happy lady.  Soup is a bit boring, add cream.  Pasta needs a little something, add cream.  Cream cake is not quite creamy enough, add cream.  Its the greatest thing in the world.

Milly hates it.  Not just single cream either but all cream variations and anything even slightly cream-like in texture.  That's just not normal is it?

I decided we were going to play with choux pastry today but I needed something that didn't involve cream or creme anglaise.  Once again, we're experimenting in the kitchen and enjoying it.

Peanut Butter Chocolate Choux Drops

(nothing like profiteroles at all.  Honest)

75ml cold water
1 egg
30g strong white flour
1 tsp caster sugar
25g + 1 tbsp butter
4 tbsp peanut butter
100g icing sugar
Milk
50g milk chocolate

To make the pastry, heat the water together with the 25g of butter in a pan until it is just melted.  Don't let the water boil.  As soon as the butter has melted remove the pan from the heat.  At this stage you need to tip in all of the flour and sugar in to the water so its a good idea to have it all ready in a bowl or jug.  Dump it in and mix like crazy until the pastry comes away from the side of the pan.

It should look something like this


and not like this

This is what happens when you aren't paying attention to the amount of water


Beat your egg and add a little at a time, mixing well each time.  The mix should slide of a spoon but definitely should not be liquid.  I used a little over half an egg but I wanted something a little wetter than normal to give a flat based drop rather than a profiterole ball. 

Grease and dampen a sheet of greaseproof paper.  Normally I just spoon the mix on to the trays but I thought piping would be more fun so we piped little messy blobs. You can make any shape and any size you want. 

Cook for about 10 - 12 minutes at 190 degrees.

Melt the chocolate (again, I went for the microwave method) and leave to the side to cool

Whilst everything is cooling prepare the peanut butter filling.  

I was hoping to sneak in some sort of cream to this, but I didn't have any so I went with a frosting variation.  I have to admit, I'm not a big fan of the eye twitching sweetness of frosting but this is just about on the edge of my tolerance for icing sugar.  The shape and size of the drops means you aren't going to put a great amount in each one.  If you love frosting, make balls and load them up.

Mix together the peanut butter and butter until they are well combined.

Sift in the icing sugar.  You should have a granulated bowl of yack at this stage so add a little milk and keep adding until it gets to a slightly wet piping consistency.  If its too sweet to taste now, add more peanut butter.

By now the pastry drops should be cool so pipe in the peanut butter frosted and dip in the melted chocolate.  Once complete bang in the fridge to let everything set.

Peanut butter choux drops


I also made a larger batch but I forgot to grease the paper.  Its been one of those days filled with a million things to do at the same time.  As a result, they stuck to the paper but I could peel them off and make little cups.  Waste not want not and all that, so I filled them with the frosting and chocolate.


Not quite so cute and bite sized but delicious all the same!